My NTFS drive suddenly shows up as RAW after a restart, and Windows wants me to format it. It has important files I haven’t backed up, and I’m trying to avoid sending it to a data recovery lab because of the cost. I need help figuring out safe recovery steps and what tools might work without making things worse.
I ran into this before, and I would not begin by trying to turn RAW into NTFS. When Windows shows a drive as RAW, what I usually saw was this: the files were still sitting on the disk, but the NTFS structure was broken enough for Windows to stop reading it.
So the safer path is boring, but it saves pain.
First, pull your files off the drive
- Stop writing anything to the RAW drive. No formatting, no initializing, no CHKDSK yet.
- Install Disk Drill somewhere else. I mean a different internal drive or another external one, not the broken disk.
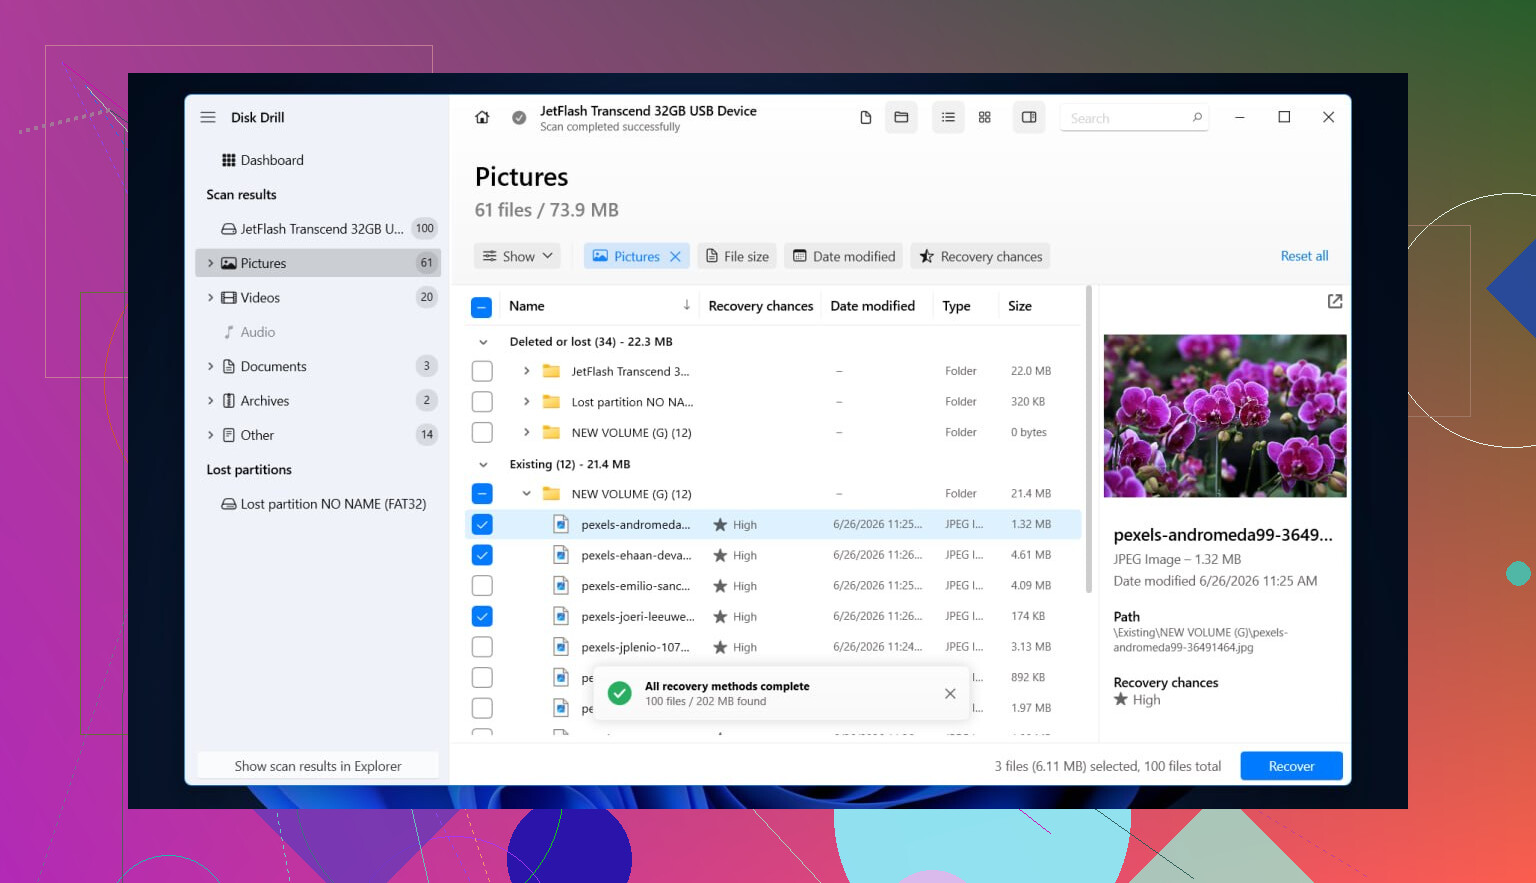
- Launch Disk Drill and pick the RAW device. If it lists both the partition and the full disk, I would scan the full physical disk first.
- Hit Search for lost data.
- Wait. Large drives take a while, and damaged NTFS scans are not quick.
- When results show up, check Existing, Deleted or lost, and Reconstructed.
- Use filters and search so you are not digging through junk for an hour.
- Preview a few files before restoring them. If previews open cleanly, I usually took it as a decent sign.
- Pick what you need.
- Recover everything to a different drive with enough free space. Do not write recovered files back onto the RAW disk. I did this once years ago. Bad move.
The reason this step matters is simple. Disk Drill reads RAW volumes without needing Windows to mount them first. In some cases it still finds folder names and original file names if part of the NTFS metadata survived. If the file system is more trashed, it falls back to file-signature results, which is less tidy but often still useful.
After your data is safe, fix the disk itself
At this stage, if you no longer need anything from the drive, then you can rebuild it as NTFS.
Option 1, format it in Disk Management
- Open Disk Management.
- Locate the RAW partition.
- Right-click it, then choose Format.
- Select NTFS.
- Leave Quick Format on.
- Rename it if you want.
- Press OK and let it finish.
This is the clean, normal route. It does not repair the old file system. It replaces it with a new one, which is why I would only do it after recovery.
Option 2, do the same thing from File Explorer
- Open This PC.
- Right-click the RAW drive.
- Choose Format.
- Set the file system to NTFS.
- Keep Quick Format checked.
- Start it.
Option 3, use DiskPart if Windows refuses to format it normally
- Open Command Prompt as admin.
- Type
diskpart - Type
list disk - Type
select disk X, where X is the RAW drive number - Type
list volume - Type
select volume Xfor the RAW volume - Type
format fs=ntfs quick - Type
assign - Type
exit
I would slow down here and double-check the disk number before pressing Enter on anything. DiskPart does not forgive sloppy clicks or sleepy typing.
One more thing. If the drive formats fine and then flips back to RAW later, I would stop trusting it with anything important. In my case, drives doing this ended up having bad sectors, flaky USB bridge boards, or hardware issues I coudln’t fix with software.
1 Like
Yes. I’ve recovered RAW NTFS drives at home more than once.
I agree with @mikeappsreviewer on one big point, do not format first. I disagree a bit on one thing though. Before a long file scan, I’d check whether the partition table or NTFS boot sector is the part that broke. If it is, you might get the whole volume back with names and folders intact, which is cleaner than file carving.
My order would be:
-
Check SMART health with CrystalDiskInfo or smartctl.
If health is bad, or reallocated and pending sectors are climbing, clone the drive first. Use ddrescue if you’re on Linux. Work from the clone, not the original. -
Try TestDisk.
It’s free. It often repairs the NTFS boot sector or finds the lost partition entry. Best case, the drive mounts again and your data is there. Worst case, no change. -
If TestDisk sees files, copy data out from there.
Do not ‘fix’ stuff until you’ve got the important files off. -
If metadata is too damaged, switch to Disk Drill.
That’s where Disk Drill helps a lot. It tends to do a better job sorting recoverable files than older free tools, esp if NTFS info is half-broken. -
After recovery, wipe and reformat the disk as NTFS. Then test it.
One more thing. Do not run CHKDSK on a RAW drive if the files matter. CHKDSK is for file system consistency, not data rescue. On damaged NTFS, it sometimes makes a mess worse.
If you want a readable step guide, this one is decent:
how to convert RAW to NTFS without losing data
Short version, yes, home recovery works a lot of the time. If the drive clicks, drops offline, or scans at snail speed, stop. That’s when DIY starts getting risky fast.

I’d split this into two separate goals: recover the data and figure out why it turned RAW. People tend to mash those together and that’s how files disappear.
I mostly agree with @mikeappsreviewer and @byteguru, but I’m a little less eager to “repair” the volume early unless the drive is clearly healthy. If this happened right after a restart, sometimes the issue is not the NTFS volume itself but the connection path. Before doing anything heavy, try a different USB cable, different port, or if it’s an external, a different enclosure/adapter. I’ve seen a perfectly fine NTFS disk show as RAW just because the USB bridge was being weird. Annoying, but real.
Also check Event Viewer for disk errors and see if the drive size shows correctly in Disk Management. If capacity is wrong or it disconnects mid-scan, that’s a red flag.
If the hardware side looks stable, I’d make a sector-by-sector image first if possible, then work from that. After that, use something like Disk Drill to scan the image instead of hammering the original disk over and over. That part gets overlooked a lot. Repeated rescans on a shaky drive is how a “recoverable” problem becomes a “whoops” problem.
One thing I do disagree with sometimes: TestDisk is great, but writing changes back to the problem disk before you have copies of the important files can get spicy fast. I’d use it more as a diagnostic tool first.
If Disk Drill can still see the original folder structure, that’s usually your easiest path. If not, recover the critical stuff first, then mess with repairs later. And yeah, absolutely do not let Windows format it just because it’s nagging you.
If you want more tools to compare, this roundup is decent:
best data recovery software for RAW and NTFS drives
If the drive is clicking, freezing Explorer, or scanning at glacial speed, stop DIY. That’s the line where lab pricing starts to make more sense, even if it sucks.

One extra angle nobody’s pushed enough: check whether the NTFS backup boot sector still matches the main one before doing any repair write. If the primary boot sector got trashed by a bad shutdown, the backup copy at the end of the volume can sometimes confirm the partition is mostly intact. That’s a much narrower problem than “the whole file system is dead.”
I slightly disagree with going straight into any fix attempt on the original disk, even with TestDisk, unless SMART looks clean and the drive behaves normally for a while. A drive that turned RAW after one restart might just as easily be failing quietly.
My order would be:
- verify the disk reports the correct capacity
- check if it works the same on another machine/adapter
- image it if there is any weirdness at all
- only then decide between metadata repair or file recovery
On software, Disk Drill is fine for the recovery side, especially if you want a cleaner interface than older tools.
Pros of Disk Drill
- easy previewing
- good at sorting found files
- can recover from RAW volumes and images
- less intimidating than command-line tools
Cons
- not magic if metadata is badly shredded
- deep scans can take forever
- free use is limited depending on platform
- can encourage people to scan the original disk repeatedly instead of imaging first
So yeah, I’m with @byteguru, @andarilhonoturno, and @mikeappsreviewer on the big rule: do not format. My addition is that if the disk size, adapter behavior, or disconnect pattern looks off, treat this as possible hardware trouble first and a file system problem second.