I accidentally deleted photos and video files from my SD card while trying to move them to my Mac, and now the card looks empty. I really need help figuring out the easiest way to recover SD card files on a Mac before anything gets overwritten.
I’ve been there, and yeah, it sucks. You finish a shoot, plug the SD card into your Mac, and Finder shows a whole lot of nothing. Or you meant to delete one bad frame and wiped the card instead. I did this once after a weekend trip and sat there staring at the screen for a solid minute. macOS and camera media do not always get along.
First thing, stop using the card now. Pull it out of the camera. Unplug it from the Mac. Deleted files are often still sitting on the card until new data lands on top of them. If you keep shooting, copying, or poking around too much, you raise the odds of killing the stuff you want back. Once sectors get overwritten, you’re done.
Before installing anything, I’d check the dumb simple stuff first.
Look at the little lock switch on the SD card. If it slid into the locked position, your Mac might act weird with it, or refuse writes, or show behavior that makes no sense. Then try another reader. Then another USB port. I’ve had a flaky dongle make a healthy card look dead. Dust, loose contact, cheap adapter, all of it matters more than people think.
One Mac-specific thing a lot of people miss is the hidden trash folder on the card itself. If you deleted files while the SD card was connected to your Mac, they might be sitting in a hidden folder called .Trashes on the card, not in the regular Trash on your desktop.
Open the card in Finder, then press Command + Shift + . to show hidden files. Look for a faded folder named .Trashes or something close to it. I pulled back a full set of images this way once. Felt stupid after, but also relieved.
If the card does not appear in Finder, open Disk Utility. Spotlight finds it fast enough. Check the sidebar. If the card shows up in gray, hit Mount. If it appears but looks off, you can try First Aid, but I’d be careful. Sometimes repair tools change enough on the card to make later recovery harder. I learned this one the annoying way.
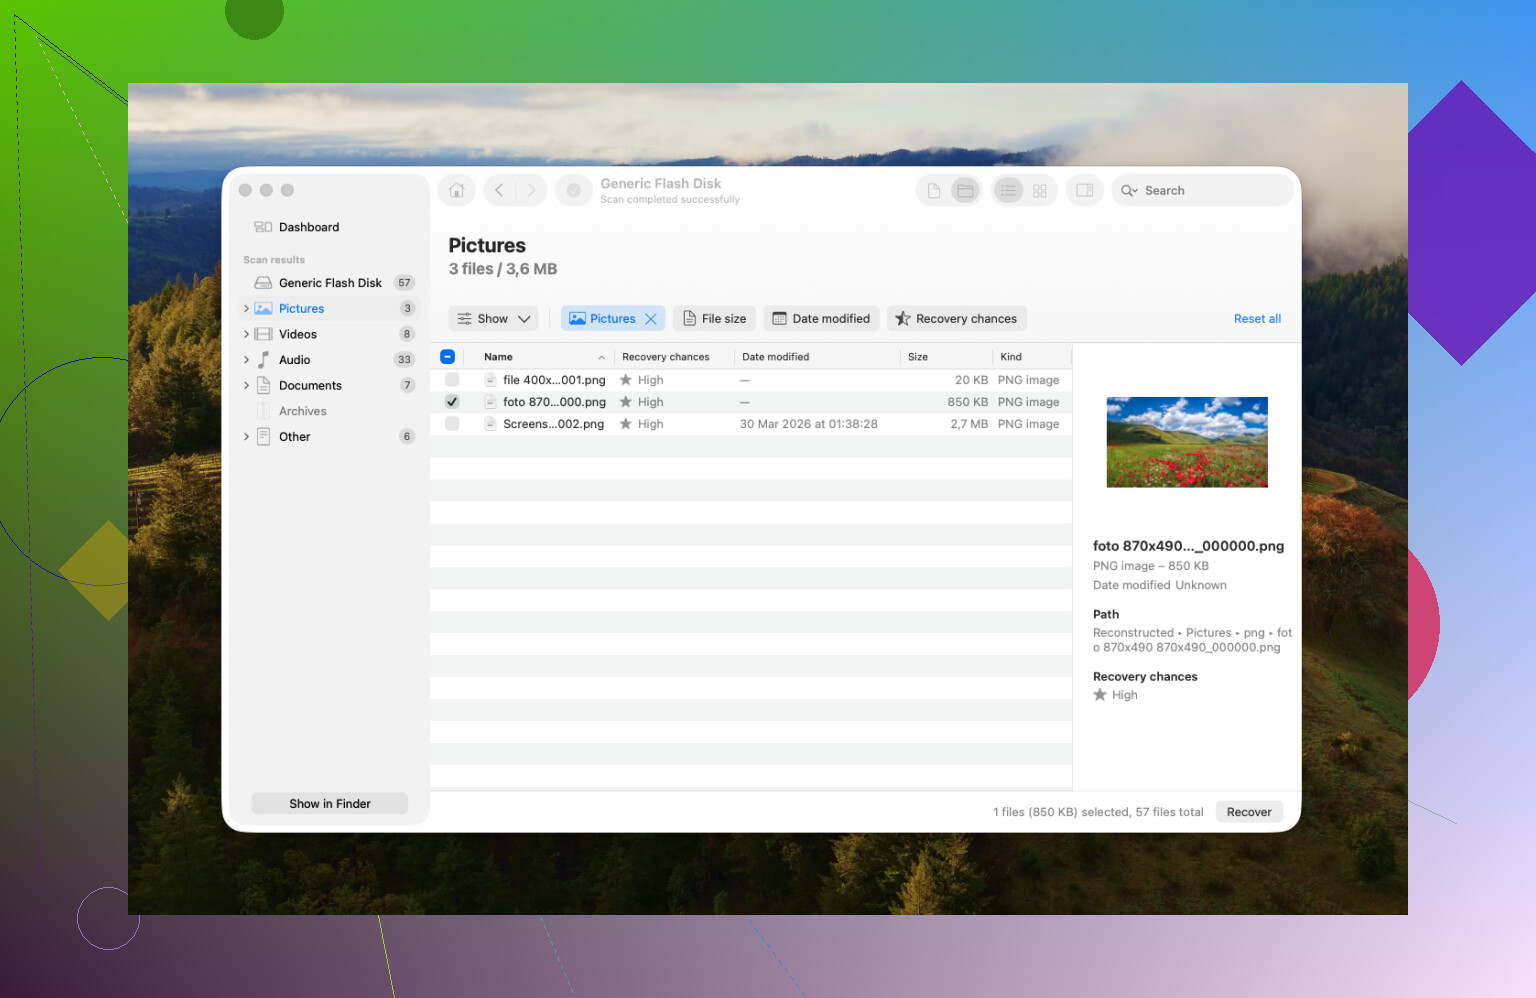
If the built-in tools get you nowhere, then it turns into a recovery software job. Out of the stuff I’ve tried on Mac, Disk Drill is the one I usually point people to first.
Main reason, it feels like a Mac app instead of some awkward port with weird buttons and broken text spacing. More important, if the SD card is acting unstable, use the Byte-to-Byte backup feature first. It makes a full image of the card, and then you scan the image instead of hammering the original media over and over. SD cards fail in ugly ways. If a card is already on the edge, a long scan on the physical card is sometimes what finishes it off.
If you shoot photos or video, this part matters more. A lot of recovery apps do okay with JPEGs and then fall apart on video clips, especially stuff from action cams or drones where files get fragmented. Disk Drill has an Advanced Camera Recovery mode for those cases. I’ve seen clips come back playable instead of half-broken black files, which is the difference between a save and a waste of time. Last time I checked, you can scan first and see what turns up before paying, which helps.
If money is tight and you don’t mind rough tools, PhotoRec is worth a look. It’s free and open source. The catch is, it’s not friendly. No polished interface. You’ll be in Terminal, pecking through menus, and recovered files usually come back with generic names like File001.jpg, File002.jpg, and so on. If you recover a few hundred or a few thousand files, sorting them becomes its own punishment. Still, when you need free, you work with what you’ve got.
A few things I’d stick to, no exceptions:
- Do not restore files onto the same SD card. Put recovered data on your Mac or an external drive. Writing recovered files back to the source card is how people erase the rest of what they were trying to save.
- Eject the card properly. I know, everyone skips this until it burns them once. Pulling a card while macOS is still indexing or writing metadata is a common way to corrupt it.
- Format the card in the camera after recovery, not on the Mac. Once your files are safe, use the camera’s own format option. That tends to keep the card structure in line with the device using it.
So yeah, don’t add anything new to the card, start with the hidden folder check, then Disk Utility, then recovery software if needed. If you move carefully, your odds are still decent. Not perfect, but decent.
4 Likes
Skip Finder first. Check what the card reports at the system level.
Open Terminal and run:
diskutil list
Find the SD card. Then run:
diskutil info /dev/diskX
You want to see if macOS still detects a filesystem, free space, and partition map. If the used space looks non-zero but Finder shows empty, the files were often hidden, the directory got damaged, or macOS did not mount it right. I’d do this before First Aid. I disagree a bit with @mikeappsreviewer there, because First Aid is fine for mild issues, but on a card with deleted media I prefer read-only checks first.
Next, look in Image Capture, not Finder. A lot of people miss this. macOS sometimes reads camera media there even when Finder acts dumb. Also check Photos import view if the card came from a camera.
If the card mounts, copy the whole card to a folder on your Mac with rsync or in Terminal. If it does not, make an image first, then work from the image. Disk Drill is the easiest Mac option for most people, mostly because the preview is fast and video recovery is better than a lot of free tools. Save recovered files to your Mac, not back to the SD card. Obvious, but people still do it.
If the card is important enough, stop DIY after one failed scan. Flash memory degrades fast when it starts going bad.
For a plain English walkthrough, try step by step SD card recovery on Mac.
Best search-friendly title for this topic:
How to Recover Deleted Files From an SD Card on Mac, Easy macOS Photo and Video Recovery Guide
One more thing, if your files were moved, not copied, check Spotlight for the filenames and sort your Mac by date added. I’ve seen “deleted” files sitting in Downloads or Pictures becuase Finder’s move operation half-finished.
I’d actually add one thing neither @mikeappsreviewer nor @espritlibre leaned on enough: check cloud/app imports on the Mac before you go full recovery mode. If you were “moving” from the card, Finder sometimes copied part of it and then the card got cleared or unmounted. So check Photos, iMovie library imports, Desktop, Downloads, and even ~/Pictures. I’ve seen files look “gone” when they were just dumped somewhere dumb by macOS.
If the card still shows the right capacity but no files, that usually means deleted directory entries, not instant total loss. In plain english, the data may still be there. Don’t run a bunch of repair stuff first. I know people love First Aid, but on removable media I’m kinda meh on it unless you already accepted possible filesystem changes.
Easiest path on Mac, honestly:
- Stop using the SD card.
- Use a different card reader if the current one is sketchy.
- Scan with Disk Drill on your Mac.
- Recover to your Mac or an external drive, never back to the SD card.
Disk Drill is probly the easiest Mac SD card recovery option if you want photos and video back without fighting command line tools for an hour. Preview what it finds first. If it sees your files with proper thumbnails or clip previews, that’s a solid sign.
Also, if the card starts disconnecting, making weird noises through the reader, or randomly remounting, stop DIY. That’s where people turn a recoverable card into e-waste.
If you want more real-world Mac SD card recovery discussion, this is a decent read:
SanDisk SD card recovery on Mac tips from Reddit
I’d add a Mac-specific check that @espritlibre, @techchizkid, and @mikeappsreviewer only touched indirectly: look for a bad card reader handshake, not just a bad filesystem.
On Macs, some cheap USB-C hubs/readers misread SD cards and show them as empty even when the data is still there. Test the card in:
- another reader
- another Mac if possible
- the camera itself, if it has playback
If the camera can still preview photos, do not run repair tools yet. That usually means the media files exist and the issue is how macOS is reading the card.
One small disagreement with the “scan ASAP” approach: if this was a MOVE, sometimes the files are already on the Mac inside a library package, especially Photos or Final Cut related imports. Use Finder search with file extensions like .jpg, .mp4, .mov, and sort by Date Modified across “This Mac”.
If recovery software is needed, Disk Drill is probably the easiest route on macOS.
Pros of Disk Drill:
- very Mac-friendly
- good preview for photos/video
- can scan SD cards and card images
- less intimidating than command-line tools
Cons:
- free use is limited
- deep scans can return lots of junk
- not my first pick if the card is physically failing hard
So my order would be: stop using card, test another reader/device, search the Mac for already-moved files, then use Disk Drill and recover to internal/external storage only. If the card disconnects during reads, stop DIY.